
Building a Private ChatGPT Interface Using Azure OpenAI + Azure AI Search + Azure AD Authentication (SSO)
Updated: May 30
Enterprise Cloud | AI | Security Solutions
Table of Contents
Building a Private ChatGPT Interface Using Azure OpenAI + Azure AI Search + Azure AD Authentication (SSO)
Complete Step-by-Step Enterprise Guide
Powered by MyTechClouds
Introduction –
In today’s enterprise environment, organizations are rapidly adopting Artificial Intelligence (AI) solutions to improve productivity, automate operations, and provide intelligent access to business knowledge. However, public AI platforms often introduce concerns around data privacy, security, compliance, and unauthorized access to sensitive enterprise information.
This guide demonstrates how to build a secure, enterprise-grade Private ChatGPT Interface using Azure OpenAI Service, Azure AI Search, Azure Blob Storage, and Microsoft Entra ID (Azure AD) Authentication with Single Sign-On (SSO). The solution enables organizations to create their own internal AI assistant capable of securely interacting with enterprise documents and generating intelligent, context-aware responses using Retrieval-Augmented Generation (RAG).
The architecture is designed using Microsoft Azure best practices and includes enterprise security controls such as:
Microsoft Entra ID (Azure AD) Authentication
Single Sign-On (SSO)
Multi-Factor Authentication (MFA)
Conditional Access Policies
Role-Based Access Control (RBAC)
Managed Identity
Private Endpoints
HTTPS-Only Communication
Centralized Monitoring & Logging
By integrating Azure AI Search with Azure OpenAI GPT-4o, users can securely search enterprise documents stored in Azure Blob Storage and receive accurate AI-generated responses grounded in organizational knowledge.
This solution is highly scalable, secure, and production-ready, making it ideal for enterprises looking to deploy their own internal AI platform while maintaining full control over identity, data security, governance, and compliance.
What this Solution Enables to the Organizations
Upload internal documents
Search enterprise knowledge
Use private AI chat
Prevent public internet exposure
Implement enterprise security controls
Build secure internal AI assistants
Architecture Overview
Solution Components
Component | Purpose |
Azure OpenAI | GPT-4 / GPT-4o model hosting |
Azure AI Search | Enterprise document indexing |
Blob Storage | Store PDFs, DOCX, TXT files |
App Service | Host frontend & backend |
Azure AI Studio | Model management |
Managed Identity | Secure authentication |
Private Endpoint | Internal secure communication |
Frontend | HTML/JavaScript Frontend |
Backend | Python Flask Backend |
|
|
Final Architecture for Building a Private ChatGPT

Prerequisites- Please Create the Subscription & Give Access (Owner or Contributor on Subscription) & install the below tools as mentioned in the Image below.
Python 3.11 installed
VS Code installed
Azure CLI installed
Git installed
Subscription & Access/Permissions
Create Azure Subscription
Owner or Contributor permissions

Step 1 — Create Resource Group as shown in below steps.
Go to Azure Portal Url – https://portal.azure.com -> Search for Resource Groups in Search Bar Menu -> Click on Resource Groups -> Click to Create.
Resource Group Name – EAUS-Private-Prod-Chatgpt-RG
Region – EAST US

Step 2 — Create Azure OpenAI Service
Go to Azure Portal → Create Resource → Azure OpenAI
Recommended Settings
Settings | Value |
Name | mytechclouds-openai |
Pricing Tier | Standard |
Region | East US |
Resource Group | EAUS-Private-Prod-Chatgpt-RG |

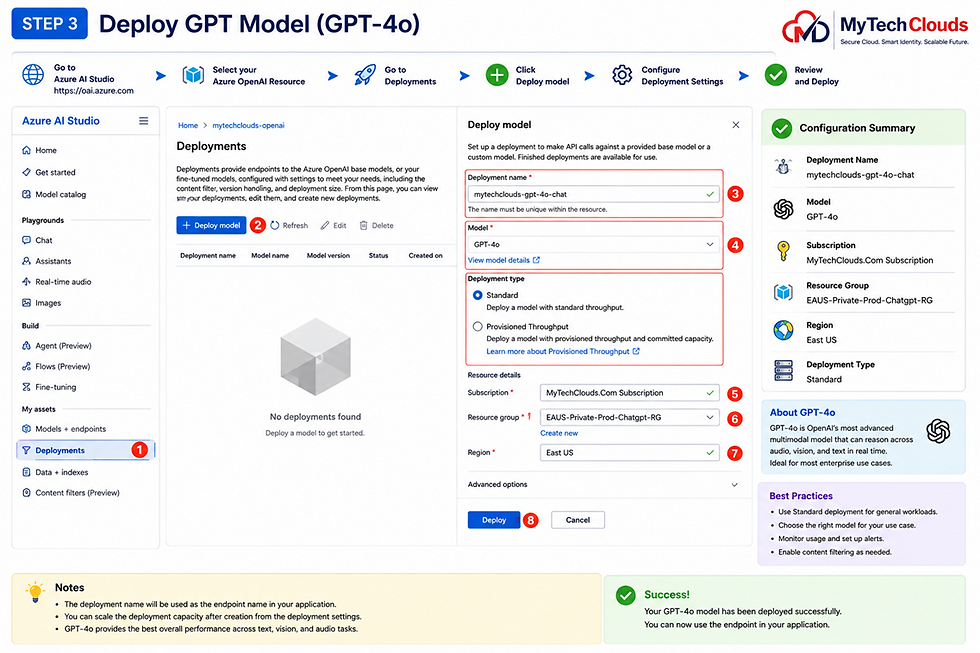
Step 3 — Deploy ChatGPT Model
Open Azure AI Studio – https://oai.azure.com
Deploy Model - Recommended
Model | Usage |
GPT-4o | Best Overall |
GPT-4 Turbo | Advanced Reasoning |
GPT-35 Turbo | Cost Optimized |
In this Lab – We will create GPT-4o which is good in over all case.
Deployment Name – mytechclouds-gpt-4o-chat
Model – GPT-4o
Step 4 — Create Azure AI Search
Steps - Azure Portal → Create Resource → Azure AI Search
Recommended Configuration –
Settings | Value |
Service Name | mytechclouds-search |
Pricing Tier | Basic/Standard |
Region | East US |

Step 5 — Create Blob Storage
Steps - Azure Portal → Storage Accounts → Create
Recommended Settings
Settings | Value |
Storage Name | mytechcloudsstrg |
Performance | Standard |
Replication | LRS |

Step 6 — Upload Enterprise Documents
Create Container -
Storage Account → Containers → Create
Container Name – documents
Upload Files –
DOCX
TXT
CSV
Knowledge base files

Step 7 — Configure Search Indexing
Create Data Source
Steps – Go to Azure AI Search → Import Data -> Choose Azure Blob Storage
Configure Indexer
Indexer Name - enterprise-index
Fields Should be as below –
Field | Type |
Content | Searchable |
metadata_storage_name | retrievable |
metadata_storage_path | retrievable |
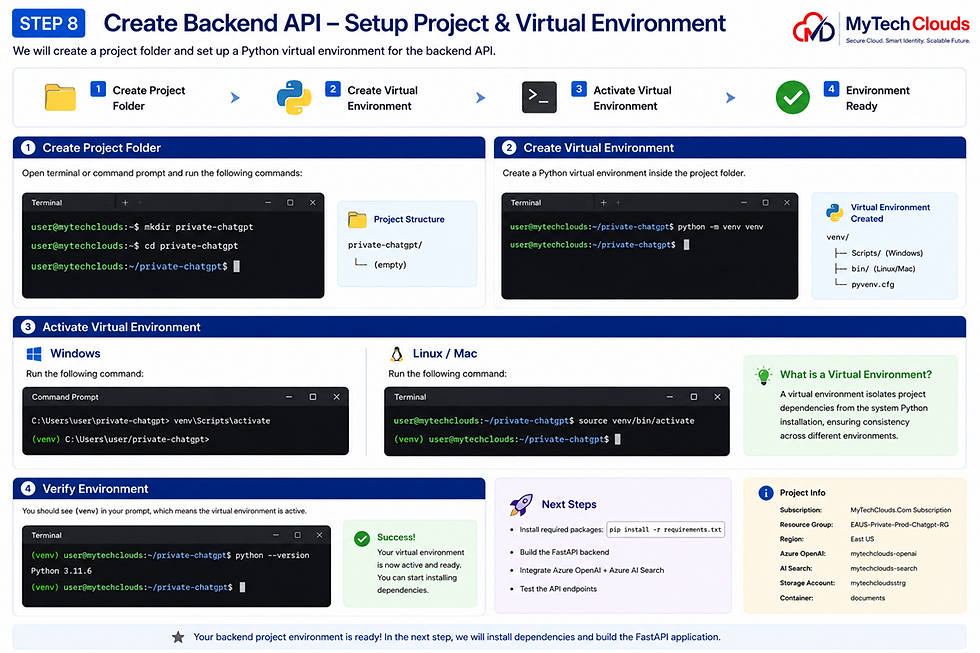
Step 8 — Create Backend API
Create Project Folder
mkdir private-chatgpt
cd private-chatgpt
Create Virtual Environment
python -m venv venv
Activate:
Windows
venv\Scripts\activate
Linux/Mac
source venv/bin/activate
Step 9 — Install Required Packages
pip install flask openai azure-search-documents python-dotenv

Step 10 — Create Environment Variables
Create .env File
AZURE_OPENAI_ENDPOINT=https://YOUR-ENDPOINT.openai.azure.com/
AZURE_OPENAI_KEY=YOUR_KEY
AZURE_OPENAI_DEPLOYMENT=gpt-4o-chat
AZURE_SEARCH_ENDPOINT=https://YOUR-SEARCH.search.windows.net
AZURE_SEARCH_KEY=YOUR_SEARCH_KEY
AZURE_SEARCH_INDEX=enterprise-index

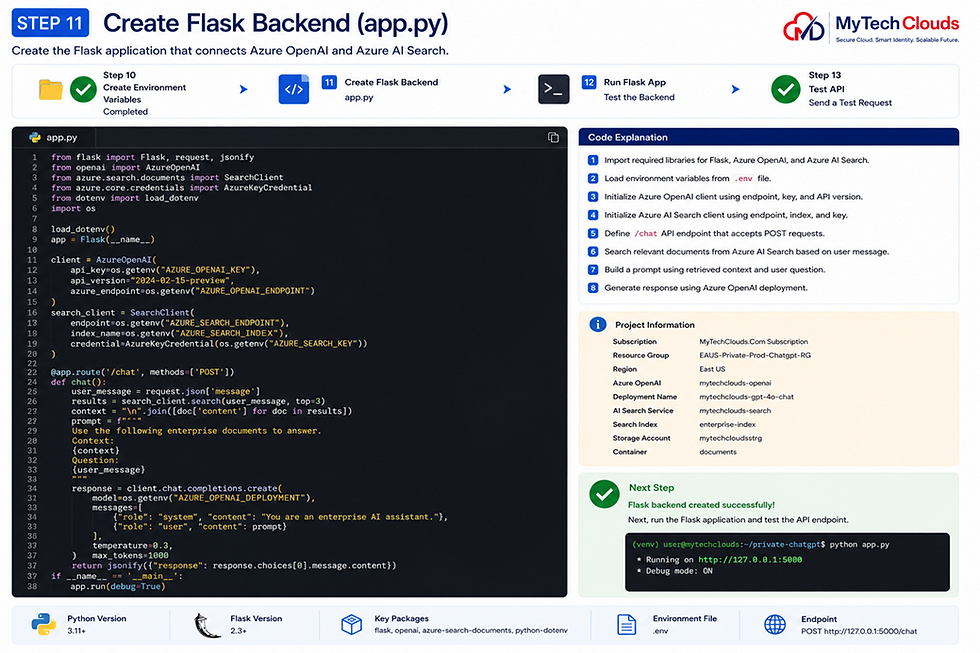
Step 11 — Create Flask Backend
from flask import Flask, request, jsonify
from openai import AzureOpenAI
from azure.search.documents import SearchClient
from azure.core.credentials import AzureKeyCredential
from dotenv import load_dotenv
import os
load_dotenv()
app = Flask(__name__)
client = AzureOpenAI(
api_key=os.getenv("AZURE_OPENAI_KEY"),
api_version="2024-02-15-preview",
azure_endpoint=os.getenv("AZURE_OPENAI_ENDPOINT")
)
search_client = SearchClient(
endpoint=os.getenv("AZURE_SEARCH_ENDPOINT"),
index_name=os.getenv("AZURE_SEARCH_INDEX"),
credential=AzureKeyCredential(os.getenv("AZURE_SEARCH_KEY"))
)
@app.route('/chat', methods=['POST'])
def chat():
user_message = request.json['message']
results = search_client.search(user_message, top=3)
context = "\n".join([doc['content'] for doc in results])
prompt = f"""
Use the following enterprise documents to answer.
Context:
{context}
Question:
{user_message}
"""
response = client.chat.completions.create(
model=os.getenv("AZURE_OPENAI_DEPLOYMENT"),
messages=[
{"role": "system", "content": "You are an enterprise AI
assistant."},
{"role": "user", "content": prompt}
],
temperature=0.3,
max_tokens=1000
)
return jsonify({
"response": response.choices[0].message.content
8
})
if name == '__main__':
app.run(debug=True)
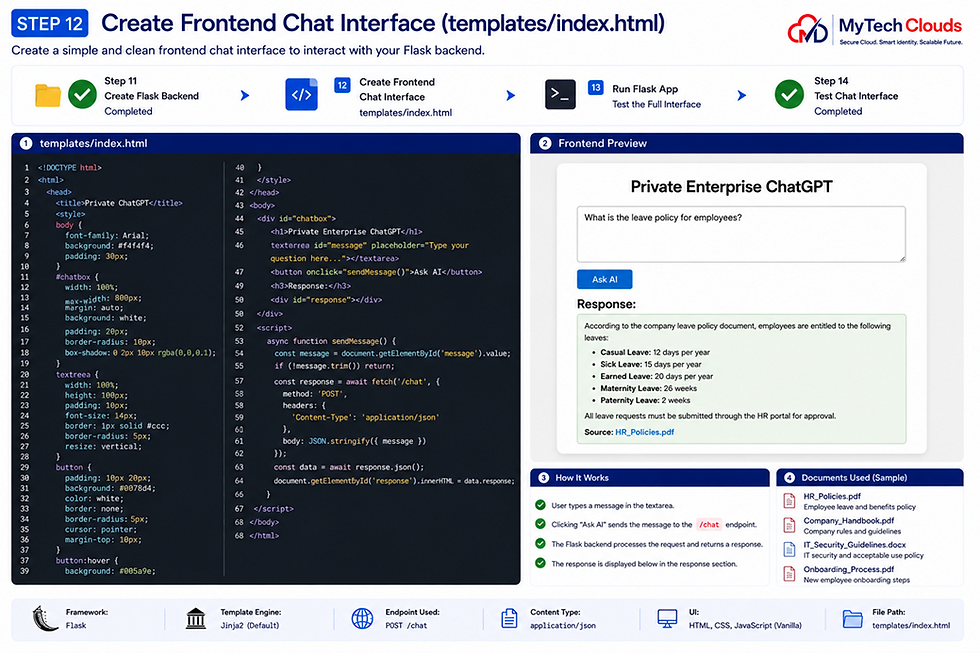
Step 12 — Create Frontend ChatGPT Interface
templates/index.html
<!DOCTYPE html>
<html>
<head>
<title>Private ChatGPT</title>
<style>
body {
font-family: Arial;
background: #f4f4f4;
padding: 30px;
}
#chatbox {
width: 100%;
max-width: 800px;
margin: auto;
background: white;
padding: 20px;
border-radius: 10px;
}
textarea {
width: 100%;
height: 100px;
}
button {
padding: 10px 20px;
background: #0078d4;
color: white;
border: none;
margin-top: 10px;
}
</style>
</head>
<body>
9
<div id="chatbox">
<h1>Private Enterprise ChatGPT</h1>
<textarea id="message"></textarea>
<button onclick="sendMessage()">Ask AI</button>
<h3>Response:</h3>
<div id="response"></div>
</div>
<script>
async function sendMessage() {
const message = document.getElementById('message').value;
const response = await fetch('/chat', {
method: 'POST',
headers: {
'Content-Type': 'application/json'
},
body: JSON.stringify({message})
});
const data = await response.json();
document.getElementById('response').innerHTML = data.response;
}
</script>
</body>
</html>
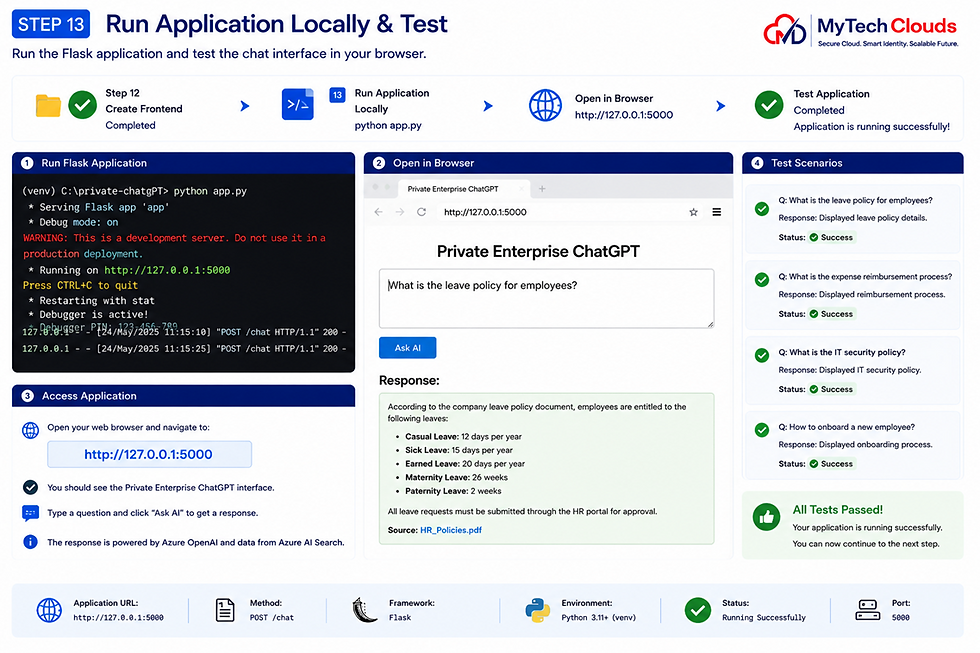
Step 13 — Run Application Locally
python app.py
Open:
Step 14 — Deploy Azure App Service
Create App Service - Azure Portal → App Services → Create
Recommended Settings
Settings | Value |
Runtime | Python 3.11 |
Plan | B1/P1V3 |
OS | Linux |
Deploy Azure App Service

Step 15 — Enable HTTPS Only
App Service → TLS/SSL Settings → HTTPS Only → ON
Step 16 — Secure Apps by Using Private Endpoint
Recommended for Production
For Backend API
Enable- Private Endpoint
Disable - Public Access
For Azure OpenAI
Enable - Private Endpoint
Disable Public Network Access
For Azure AI Search
Enable- Private Endpoint

Why Azure AD Authentication?
Azure AD enables secure enterprise authentication for your private ChatGPT application.
Benefits include:
Single Sign-On
Multi-Factor Authentication
Conditional Access Policies
Corporate identity integration
Role-based access control
Secure enterprise login experience
Authentication Flow

Step 17.1 — Register Application in Azure AD
Go To - Azure Portal → Microsoft Entra ID → App Registrations
Click – New Registration
Recommended Settings
Settings | Value |
Name | Mytechclouds-private-chatgpt-app |
Supported Account Types | Single Tenant |
Redirect URI | Web |
Example Redirect URI

Step 17.2 — Configure Authentication in App Service
Go To - App Service → Authentication
Enable - App Service Authentication = ON
Add Identity Provider – Microsoft
Choose – Existing App Registration
Select –
Client ID
Tenant ID
Client Secret
Step 17.3 — Configure Login Settings
Recommended:
Settings | Value |
Require Authentication | Yes |
Unauthenticated Request | HTTP 302 Redirect |
Token Store | Enabled |
Step 17.4 — Configure Redirect URIs
Inside App Registration:
Authentication → Redirect URIs
Step 17.5 — Create Client Secret
Go To - Certificates & Secrets → New Client Secret
Copy:
Secret Value
Store securely in:
Azure Key Vault
App Service Settings

Step 17.6 — Restrict Access to Corporate Users Only
Inside Enterprise Applications - Users and Groups → Assign Users
Add-
IT Team
Developers
Security Team
Specific Departments
This ensures only authorized users can access the private AI system.

Step 17.7 – Enable Multi-Factor Authentication (MFA)
Go To – Entra ID -> Conditional Access
Create Policy - Require MFA for Private ChatGPT Application
Recommended Policies:
Require MFA
Block legacy authentication
Restrict risky sign-ins
Restrict external users

Example Flask Code
from flask import request
@app.route('/profile')
def profile():
user = request.headers.get('X-MS-CLIENT-PRINCIPAL-NAME')
return {
'logged_in_user': user
}

You can create Application Role as –
Role | Permission |
Admin | Full Access |
AI User | Chat Access |
Auditor | Read-Only Access |
Developer | Testing Access |
Step 17.10 — Secure Backend APIs
Recommended:
Validate JWT Tokens
Use Managed Identity
Restrict APIs via App Service Authentication
Disable anonymous access

Step 17.11 — Recommended Enterprise Security Architecture

Step 17.12 — Recommended Production Enhancements
Feature | Purpose |
Conditional Access | Risk-Based Login Control |
Privileged Identity Management | Admin protection |
Defender for Cloud Apps | Session monitoring |
Identity Protection | Detect risky sign-ins |
Key Vault | Secure secret storage |
Microsoft Best Practices
Recommended Security Controls
Enable MFA for all users
Use least privilege access
Disable public backend APIs
Use Private Endpoints
Monitor authentication logs
Enable Defender for Cloud
Step 18 — Add Azure Entra ID Authentication
Portal Steps - App Service → Authentication
Enable:
Microsoft Identity Provider
Require Authentication
This ensures:
only corporate users access AI
SSO integration
MFA support

Step 19 — Enable Logging & Monitoring
Recommended Services
Service | Purpose |
Application Insights | Monitoring |
Log Analytics | Logs |
Defender for Clouds | Security |
Azure Monitor | Alerts |

Step 20 — Recommended Production Enhancements
Add Features
Feature | Purpose |
Streaming Response | Real Time Typing |
RAG Architecture | Better Documents Answers |
Semantic Search | Improved Relevance |
Role Based Access | Department Isolation |
API Management | Secure API Gateway |
Front Door + WAF | Web Protection |
Content Filtering | Responsible AI |
Enterprise Security Best Practices
Recommended Security Architecture
Components | Recommendations |
Azure OpenAI | Private Endpoint |
AI Search | Private Endpoint |
Storage | Private Endpoint |
Backend | VNET Integrated |
Authentication | Entra ID |
Secrets | Key Vault |
Traffic Protection | WAF |
Recommended Folder Structure

Example RAG Workflow

Cost Optimization Tips
Component | Recommendations |
GPT Model | Use GPT-35 for Simple Tasks |
Search Tier | Basic for POC |
Blob Storage | Cool Tier |
App Service | B1 Initially. |
Troubleshooting Tips – Common Errors
Error | Solution |
401 Unauthorized | Check API Keys |
Search Returns Nothing | Rebuild Index |
Timeout | Increase App Service Plan |
Deployment Failure | Verify Python Runtime |
CORS Issue | Configure Allowed Origin |
Future Enhancements
Voice Chat
Multilingual AI
OCR document ingestion
Image understanding
Agentic AI workflows
Teams integration
Slack integration
SharePoint ingestion
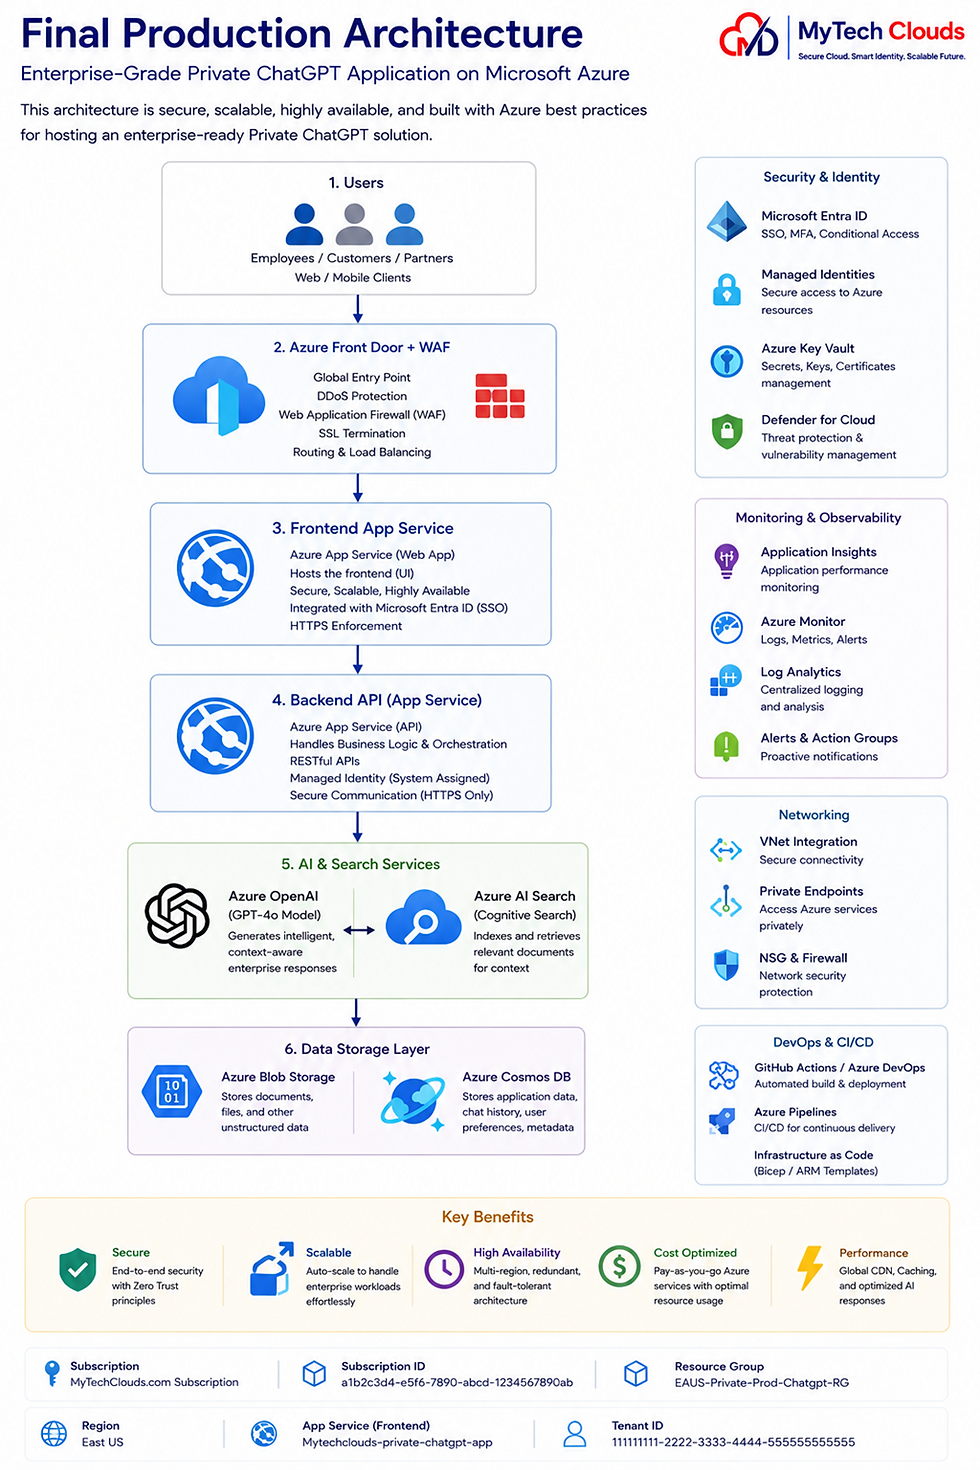
Final Production Architecture
Conclusion
Building a private ChatGPT-style enterprise AI assistant using Azure OpenAI and Azure AI Search enables
organizations to securely leverage generative AI with their own enterprise data.
By implementing proper networking, private endpoints, authentication, monitoring, and search indexing,
organizations + Entra ID Authentication + Conditional Access Policies can build highly secure and scalable AI solutions for internal users
End of the Documents – Thanks for Reading
About MyTechClouds
Who we Are
Empowering Businesses Through Cloud & AI
MyTechClouds.Com is an ISO Certified global cloud and AI solutions company specializing in cloud architecture, identity management, security, automation, and AI infrastructure. We help businesses build secure, scalable, and high-performance environments across AWS, Azure, and GCP.
The company focuses on cloud architecture, landing zone implementation, identity & security, automation, and cost optimization, helping businesses modernize infrastructure and operate efficiently in the cloud.
Website : https://www.mytechclouds.com
Comments